Monday, August 10, 2015

wood slice chalkboard


I know that you've seen these around... those wood slice chalkboards. I've seen them for sale about everywhere. Did you know that they're super easy to make too? I made one in the picture below!


I went for a little shopping trip to my local craft store. I ventured down the aisle with all of the wood products. I've mentioned it in my rustic cake stand post that you can buy slices of wood in varying sizes and shapes.

I then picked up a jar of chalkboard paint in a color that matched my decor (which has since changed... since I made this baby months ago). You will want to put multiple layers of paint on the wood. If you don't put enough, the chalk will be difficult to erase. I used a sponge paint brush to do this, so I could have more control around the edges.

Then I screwed a picture hook to the back of the slice so that I could hang it on the wall.

Super easy, quick, and a fun piece to add to your decor.

Here is a little inspiration that I found from pinterest for your own project.

This is the one that inspired me!!

Sunday, August 9, 2015

July Wantable Fitness Edit

I'm obsessed with subscription boxes.... especially the ones where they send you clothes and then you send back whatever you don't like. I just received my Wantable Fitness box. Wantable has multiple boxes that you can select from. I'm a bit of a yoga addict, therefore I am always looking for good items to wear to yoga class. Normally I try to take pictures of all the items I receive (I'm also hooked to Instagram), but I never got around to it this time. Here are the items that I kept this month:


Let me just note that this pictures does NOT do the color of this tank justice!


Please Note: Wantable did not compensate me for this review. I pay full price for the subscription and pay the prices they offer for the products. Images came from the  manufacturer's websites.

Monday, August 3, 2015

Rustic Cake Stands

I made these pretty sweet cake stands for my friends bridal shower, and I promised you a tutorial. This was a super easy craft.


I had the wood slices cut for me awhile back. I originally intended on using them for chalkboards, but they weren't going to work for that. So, they basically sat around for close to a year waiting to be used. Many craft stores sell slices of wood that are beautiful, so you could definitely grab one of those.

Because they were actually hand cut, I needed to start my sanding them down. If you do this yourself, I would HIGHLY recommend using an electric sander. However, I used a piece of sandpaper.. and eventually gave up.

Then, I used a satin finish varnish to seal the top of the wood. I did not seal the bottom side, because I wanted to keep the rough surface. Plan on using multiple layers of varnish to give it a completely smooth finish. I'm not sure if the varnish is safe for food, so I would definitely recommend making sure you use a cardboard cake plate, and not setting the cake on the wood directly.

I found a wooden pedestal at a craft store for only about $5. I then painted it a dark purple to match the colors of the bridal shower. I have also seen these made with glass candlesticks, but I have never had much luck with gluing glass, and I wanted something I could reuse.

I then used an industrial strength adhesive made for wood to glue the pedestal to the bottom of the wood slice. I used E6000 Industrial Strength, and haven't had any issues. The glue recommends letting it sit for 72 hours before moving. I procrastinated and moved after about 12, but it had hardened enough at that point. However, I would recommend going the full 72 hours to be safe.

Super easy peasy project!! This is something that looks super unique but was extremely easy to put together. If you make your own, I would love for you to share your pictures!!


Monday, July 27, 2015

My bff's bridal shower...

On July 12th, I helped to host my best friend's bridal shower. Her and I have been friends since high school, and I'm so excited she has found someone to spend her life with. She has selected 10 bridesmaids, which include 2 maids of honor and her sister as the matron of honor. I wanted to share with you some pictures from her bridal shower. Between the three of us, we worked hard to have the best bridal shower we could throw. I know she was definitely happy with the outcome. :)

The Welcome Table:

We used recycled aluminum cans for the flowers, some of which were painted and some where not. The bucket was one that Erin brought from her daughter's graduation party. The chalkboard, I found at Hobby Lobby.

One of my favorite aspects was the guest "book". I purchased a slice of wood from one of the major craft stores (I know I have seen them at Micheal's, Hobby Lobby, and Joann Fabrics). Katelyn's future Mother-in-Law used the Sharpie marker to write "K+S" in the center, to make it look like a carving in a tree. I had purchased an oil-based sharpie, but I think you could use a regular one too. 

We had also found a lady who makes different flavored jams in her home. For the bridal shower, she made us 25 Strawberry and 25 Blueberry jams. (I was able to bring one of each home and they were quite delicious). Katelyn actually created the sticker for the top and then we tied pieces of hemp around each jar. 

In the top picture, you can see a large jar. I found this at Michaels and it is just a very large mason jar. We labeled it "Memory Jar" for one of our games.

There was also a vase filled with corks for a game, and a small crate that I decorate to collect the answers for the "guess the number of corks" game.

The Food Table:


This was an old window that Allie had at her house, and was willing to bring for the shower. I used a decorative burlap ribbon to hand a paper letter "H" that I had decorated.

Below, you can see the vintage looking milk bottle and a decorated wine bottle, as well as a crate. 

 An overview of the food table.  In the back, you can see a branch centerpiece I created. I used a metal bucket and a battery operate branch. Then purchased some dark purple pebbles to hide the foam I used to hold the branch upright. 

I also found the tiered tray at Gordman's just a couple days before the shower. It's a galvanized steel tray and it was only $25. 


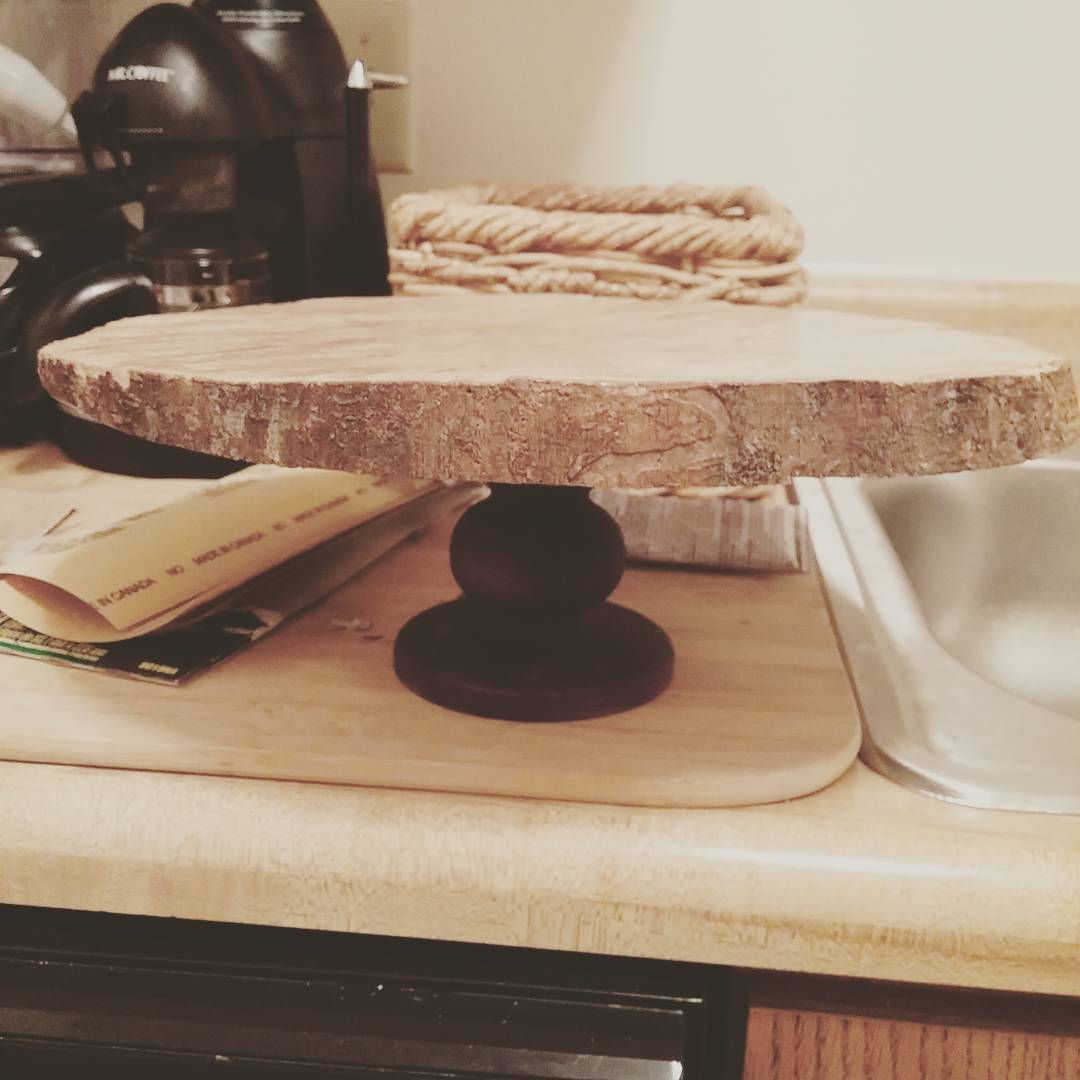
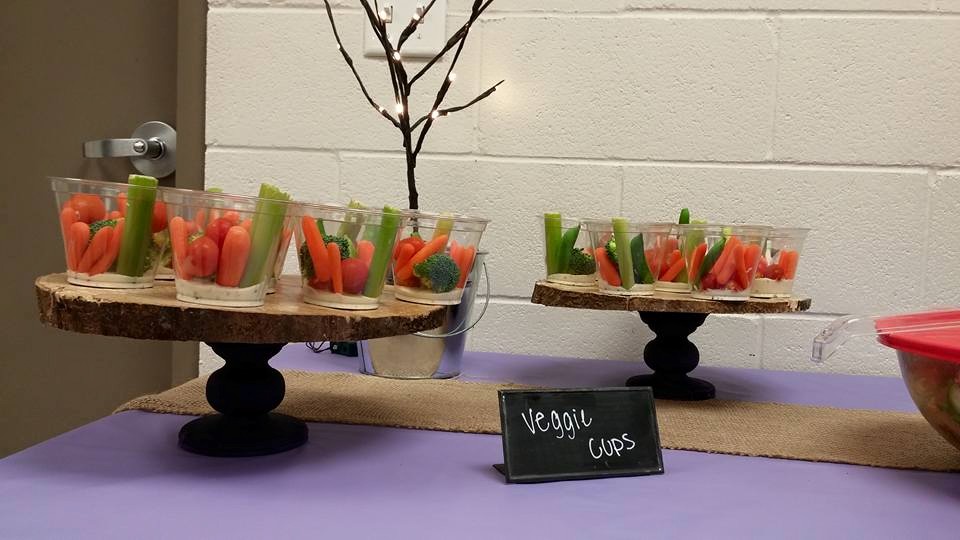
I made two of the cake stands. I had the pieces of wood from a friend who cut them for me awhile ago (and then I never used them), this is why they look lopsided. I purchased wood pedestals, painted them and glued them to the bottom. I'll have an entire separate post on their creation.

Miscellaneous:


Overview of the cake table.


I created these little bucket vases. I purchased the buckets from Hobby Lobby and then glued the purple decorated ribbon around the center. I purchased the burlap flower already made (I think from Micheals) and glued it to the front. I had to cut some of the ribbon since the bucket is tapered. This kept the ribbon flat. 


The entire bridal party. It's a huge group!!
 

This ladder was another one of Allie's contributions. I purchased a kit to make the yellow flowers from Joann Fabrics. We then used glue dots to stick them to the ladder. This piece of decor was one of Katelyn's must haves, although we definitely made it our own.
 
  From Left to Right: Matron of Honor, Erin, Maids of Honor, Me and Allie, and the Bride, Katelyn.

Monday, July 20, 2015

Where have I been?

I've been slacking. I'll admit it. I created this blog and then abandoned it. I'm sorry.

I've moved, things have changed... slightly.

I now live in a bigger city (than my previous small town) in Northeast Indiana. I won't lie, it's been a bit of a struggle. Things seem to be falling in place, but I have yet to meet people. I'm sure when I have my first friend, you will hear all about it.

Even more exciting... I have a puppy! Her name is Kassie and she's 2 years old, prime teenage years right there! She was an outside dog prior to her coming to live with me, and had zero training. I'm not going to lie... we're still working on housetraining. I think part of the problem is that she thinks she is a human. And it's so hard to get mad at her... she's beautiful!


I have some exciting stuff to write about though, so you will be seeing that in the near future. We just had my best friend's bridal shower, and I would really like to post the pictures for you to see.

Anyways, you will being seeing more of me.

Hugz and Kisses...

<3 Me


Tuesday, October 14, 2014

Crazy, busy green onions

I have been super busy lately. Great time to start a new blog, right?  I have my full time job doing the responsible thing, a part time job at a local yoga studio, and then there's the rest of my life... which I tend to believe is incredibly busy. The rest of my life usually consists of naps, shopping, and hanging out with my boyfriend and other friends. 

Anyways, one of the things I have been learning is food preservation. Of course, we all want to eat healthy... and of course, we don't want to buy produce because it goes bad so quickly! I've been regrowing my green onions from scraps. I thought I would share, in case you have never tried this.

Step One: Buy green onions
Step Two: Put green onions in a glass or jar
Step Three: Put just enough water in the bottom to cover the roots.


Easy Peasy!

But in all seriousness... here are a few more tips:
  • If your green onions have any sections that are dried out and dying, you'll want to peel those off. This will just encourage rotting. 
  • You will also need to change the water every couple of days. I like to take them out when I do, and just make sure there is no mold or rot that is not as easily seen through the grass.
  • You can keep the onions on the countertop or in the refrigerator. However, if you refrigerate them, they will not grow as quickly (and yes, they do regrow!)... So keep that in mind. 
  • Lastly, they will not live forever. Eventually they will start to die. However, you just got a ton more use out of a bunch of green onion!
 I hope you enjoyed this little bit of information and please let me know if you have tried this and if you have any tips you can provide!

Tuesday, October 7, 2014

Please allow me to introduce myself...

Hello all!

I'd like to introduce myself and tell you my story! I'm the owner of the previous blog Eccentric Delirium... which has frankly gone to shit. I lost track of it, and then one day most of my pictures were gone. It is time to start fresh! If you never visited my previous blog... here is a little bit about me.

I am 26 years old.

I live in the Midwest, specifically Northwest Ohio.

I have a Bachelor's Degree that I have yet to use.

I have an amazinggg boyfriend who says he'll never break my heart.


I do yoga.


I love to cook.


I love health food.


But I also really like beer.


And above all else, I love animals the most. (especially unicorns)


If I was to create a dating profile (which I obviously have no intention of doing), that is what I would put in it. This should be enough to catch your attention and make you want to hear what I have to say, and if not... then feel free to stalk my life!

Peace, love, and craziness!